Donor Tools

Recording A Donation - Donor Tools User Guide

  • Sign In
  • Quick Start
    • Welcome Video
    • Signing In
    • Public Profile
    • Set Your Fiscal Year
    • Setting Up PayPal
    • System Requirements
  • Importing Data
    • Introduction To Importing
    • Uploading Your File
    • Importing Donors
    • Importing Donations
    • Importing A Mixed File
    • Data Quality
    • Supported Fields
    • Undoing An Import
    • Updating Existing Records
    • Data Tips
  • Data Management
    • Creating A Donor
    • Recording A Donation
    • Editing A Donation
    • Editing A Donor
    • Merging Two Donors
    • Funds
    • Sources
    • Important Dates
    • Soft Crediting A Donation
    • Relationships
    • Users
    • Custom Data Types
    • Find Duplicates
    • Pledges And Pledge Payments
    • Recording A Note
    • Tag Many Donors At Once
    • Tagging Donors
  • Reporting
    • Donations Report
    • Exporting Donations
    • Exporting Donors
    • Generate A Tax Receipt
    • Print A Report
    • Smart Tag: Donors In Year
    • Smart Tag: Filter By State
    • Smart Tag: New Donors
    • Smart Tags
    • Year End Reports
  • Acknowledgements
    • Thank You Emails
    • Thank You Letters
    • Mail Merge Fields
    • Letterhead
    • Year End Statement: Email
    • Year End Statement: Print
  • Fundraising
    • Creating Fund Pages
    • Customizing Fund Pages
    • Fundraising Event
    • Online Donation Widget
    • Paypal: Recurring Donations
  • Tips And Tricks
    • Anonymous Donors
    • Bulk Mailings
    • In Kind Donations
    • Print Labels & Envelopes
    • Volunteer Hours
  • Integrations
    • MailChimp
    • PayPal
    • Quickbooks Export
  • Donor Self Service
    • Signup As A Donor
  • API
    • Overview
    • Pagination
    • Funds
    • Sources
    • People
    • Donations
    • Emails
    • Organization
    • Soft Credits
    • Types

Recording a Donation

One of the things that we wanted to accomplish with Donor Tools was to provide workflows that help you get closer to your donors while still working efficiently. So we’ve made it really easy to enter a lot of donations very quickly while still giving each donor individual attention. The process goes something like this:

Related

  • Soft Crediting a Donation
  • Donations API

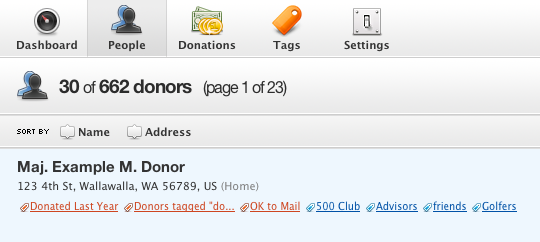
Go to the donor record.

One way to do this is to use the search box (in the upper left-hand corner) and search for a donor. If only one donor matches your search, Donor Tools will jump right to their record. Otherwise, you can choose the donor from the list.

You can also click the Donors tab and then click the name of the donor to go to their record. Donor Tools Donor List

Enter the donation details.

If the donor has a donation history, Donor Tools will try to guess this new donation’s information, including the amount, the fund, and the payment method.
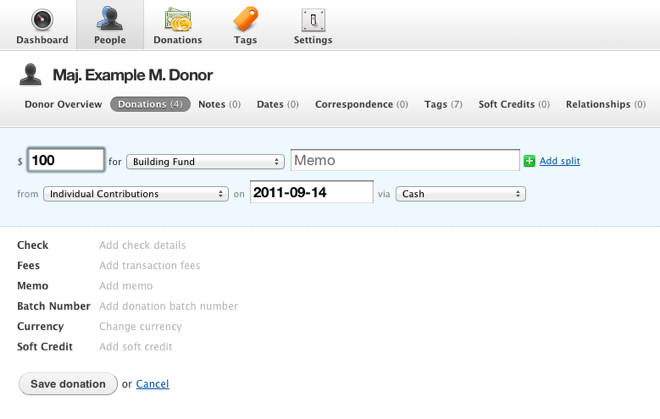
 Donor Tools New Donation Form

Donation Splits

If a donation is split between multiple funds, then you'll want to split the donation. To do so, simply click "Add split". Enter an amount for the second split, and assign it to the appropriate fund. Donor Tools New Donation Form with Donation Splits

Save

Click Save, and that’s it. The donation will appear with a flash directly below the donation form. Donor Tools Donation Listing From here you can send a letter or email acknowledgement, or move on to the next donation.

Quick Data Entry

After you save a donation, your cursor will automatically move to the search box in the upper left-hand corner of the screen. You can easily search for the next donor from here.

Additionally, the system will remember most of the attributes of the donation you just entered, including the donation date, the fund, and other details, making it easier for you to enter the next donation.

All text and images copyright © 2008-2022 Donor Tools. All rights reserved.

Donor Tools™ is a big idea by Higher Pixels, LLC.

Privacy Policy • Terms of Service • Contact Support